


K8s as a cloud-native operating system, the need to learn it speaks for itself, if you encounter any problems, you can comment in Discussions or Issue, if you think this repository is valuable to you, welcome to star or raise PR / Issue to make it better!
Before learning this tutorial, you need to note that this tutorial focuses on practical guidance to modify the code in an incremental way, starting from the most basic container definition, through pod, deployment, service, ingress, configmap, secret and other resources until the helm to packaged deployment of a complete set of services. So if you don't know much about the basics of containers and k8s, it is recommended to get the basic theoretical knowledge from the official documentation or other tutorials first, and then deepen your mastery of the knowledge through real-life practice!
Here is the index of this document:
- Preparation
- container
- pod
- deployment
- service
- ingress
- namespace
- configmap
- secret
- job/cronjob
- helm
- dashboard
- Translate English(unfinished)
Before starting this tutorial, you need to configure your local environment. Here are the dependencies and packages that need to be installed.
First we need to install docker to package the image, if you already have docker installed locally, then you can choose to skip this section.
The easiest way to install docker is to use Docker Desktop currently, just open the official website and download the package that corresponds to your computer's operating system (https://www.docker.com/products/docker-desktop/)
When the installation is complete, you can quickly verify that the installation was successful by using docker run hello-world!
Currently, Docker has announced that Docker Desktop is only free for individual developers or small groups (no longer free for large companies from 2021), so if you can't install docker via Docker Desktop, you can refer to this article to download and install docker. without-docker-desktop-on-macos) to install only the Docker CLI.
We also need to build a local cluster of k8s (either using a cloud vendor or another k8s cluster). The recommended way to build a local k8s cluster is to use minikube.
You can download and install according to minikube quick install, here is a brief list of MacOS installation, Linux & Windows OS can refer to official documentation for a quick installation.
brew install minikubeBecause minikube supports many containers and virtualization technologies (Docker, Hyperkit, Hyper-V, KVM, Parallels, Podman, VirtualBox, or VMware Fusion/Workstation), is also the place where the problem appears more often, so it is better to explain it here a little.
If you are using the docker solution recommended above Docker Desktop, then you can start minikube with the following command and wait patiently for the dependencies to download.
minikube start --vm-driver docker --container-runtime=dockerWhen you're done, run minikube status to check the current status to make sure it started successfully!
If you only have the Docker CLI locally, and the criterion is that if you execute a command like docker ps and it returns the error Cannot connect to the Docker daemon at unix:///Users/xxxx/.colima/docker.sock. daemon running? Then you need to run the following command.
brew install hyperkit
minikube start --vm-driver hyperkit --container-runtime=docker

# Tell Docker CLI to talk to minikube's VM
eval $(minikube docker-env)

# Save IP to a hostname
echo "`minikube ip` docker.local" | sudo tee -a /etc/hosts > /dev/null

# Test
docker run hello-world
minikube command quick search
minikube stop Does not delete any data, just stops the VM and k8s cluster.
minikube delete Delete all minikube data after startup.
minikube ip View the IP address where the cluster and docker engine are running.
minikube pause Suspend current resources and k8s clusters
minikube status View current cluster status
This step is optional, if not installed, all subsequent kubectl related commands will be replaced by the minikube kubectl command.
If you don't want to use minikube kubectl or configure the relevant environment variables for the following tutorial, you can consider installing kubectl directly.
brew install kubectlSince the default image address used by minikube is DockerHub, we also need to register an account in DockerHub (https://hub.docker.com/) and log in to the account using the login command.
docker loginOur journey begins with a piece of code. Create a new main.go file and copy the following code into it.
package main

import (
	"io"
	"net/http"
)

func hello(w http.ResponseWriter, r *http.Request) {
	io.WriteString(w, "[v1] Hello, Kubernetes!")
}

func main() {
	http.HandleFunc("/", hello)
	http.ListenAndServe(":3000", nil)
}
The above is a string of code written in Go, the code logic is very simple, first start the HTTP server, listen on port 3000 and return the string [v1] Hello, Kubernetes! when the route / is accessed.
In the old days, if you wanted to get this code up and running and test it. You first needed to know how to download the golang installation package and install it, then you needed to know the basic use of golang module, and finally you needed to know the compile and run commands of golang to get that code up and running. Even in the process, it may fail to compile or run due to problems with environment variables, operating system issues, processor architecture, etc.
But with Container (container) technology, all you need is the above code with the corresponding container Dockerfile file, then you don't need any knowledge of golang to get the code running smoothly.
Container is a sandbox technology. It is based on a combination of Namespace / Cgroups / chroot technologies in Linux. For more technical details, please refer to this video How to implement a container by yourself.
The following is the corresponding Dockerfile for the Go code. The simple solution is to use the golang alpine image to package it directly, but since we need to push the image to DockerHub and pull the image to the k8s cluster frequently for subsequent exercises, we choose to run the Go code in golang:1.16-buster first in order to optimize the network speed. and then copy the binaries to the base-debian10 image (it doesn't matter if you don't understand the Dockerfile, it doesn't affect the learning process).
This way we can turn a 300MB image into a 20MB image, or even compress it and upload it to DockerHub with a size of 10MB!
# Dockerfile
FROM golang:1.16-buster AS builder
RUN mkdir /src
ADD . /src
WORKDIR /src

RUN go env -w GO111MODULE=auto
RUN go build -o main .

FROM gcr.io/distroless/base-debian10

WORKDIR /

COPY --from=builder /src/main /main
EXPOSE 3000
ENTRYPOINT ["/main"]
Note that the main.go file needs to be in the same directory as the Dockerfile file, execute the docker build command below, and wait patiently for the first time to pull the base image. And be careful to replace guangzhengli in the command with your DockerHub registered account name. This will allow us to push the image to our DockerHub repository.
docker build . -t guangzhengli/hellok8s:v1
# Step 1/11 : FROM golang:1.16-buster AS builder
# ...
# ...
# Step 11/11 : ENTRYPOINT ["/main"]
# Successfully tagged guangzhengli/hellok8s:v1


docker images
# guangzhengli/hellok8s          v1         f956e8cf7d18   8 days ago      25.4MB
After the docker build command finishes we can check if the image was built successfully with the docker images command, and finally we execute the docker run command to start the container, with -p specifying 3000 as the port and -d specifying the name of the image that was just packaged successfully.
docker run -p 3000:3000 --name hellok8s -d guangzhengli/hellok8s:v1After running successfully, you can access http://127.0.0.1:3000 via your browser or curl to see if the string [v1] Hello, Kubernetes! was successfully returned.
Here because I only use Docker CLI locally, and docker runtime is using minikube, so I need to call minikube ip first to return the minikube IP address, for example, 192.168.59.100 is returned, so I need to visit http://192.168. 59.100:3000 to determine if the string [v1] Hello, Kubernetes! was successfully returned.
Finally, make sure there are no problems, and use docker push to upload the image to the remote DockerHub repository, so that others can download and use it, as well as to facilitate the subsequent Minikube downloads. Be careful to replace guangzhengli with your own DockerHub account name.
docker push guangzhengli/hellok8s:v1After the exercises in this section, do you have an initial understanding of the power of containers? Imagine when you want to deploy a more complex service, such as Nginx, MySQL, Redis. All you need to do is go to DockerHub search and search for the corresponding image, download the image via docker pull, and docker run to start the service. and start the service! No need to care about dependencies and configuration!
If all the services running in the production environment are standalone monolithic services, then Container (container) is enough, but in the actual production environment, maintaining a large scale cluster and a variety of different services, there are often a variety of relationships between services. And the handling of these relationships is the most difficult part of manual management.
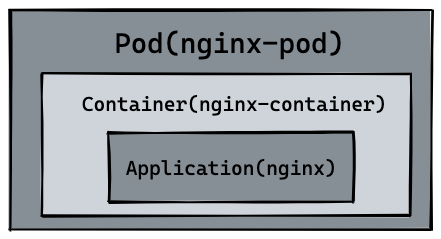
Pod is the first k8s resource we will create, and the smallest deployable unit of compute that can be created and managed in Kubernetes. Before we understand the difference between a pod and a container, we can try creating a simple pod
We start by creating the nginx.yaml file and writing a Pod that creates nginx.
# nginx.yaml
apiVersion: v1
kind: Pod
metadata:
  name: nginx-pod
spec:
  containers:
    - name: nginx-container
      image: nginx
where kind indicates that the resource we want to create is of type Pod, metadata.name indicates the name of the pod to be created, and this name needs to be unique. spec.containers indicates the name of the container to be run and the name of the image. The default source of the mirrors is DockerHub.
We run the first k8s command, kubectl apply -f nginx.yaml, to create the nginx Pod.
Next, use kubectl get pods to see if the pod is started properly.
Finally, use the kubectl port-forward nginx-pod 4000:80 command to map the default 80 port of nginx to the local 4000 port, and open a browser or curl to access http://127.0.0.1:4000 and see if the nginx default page is successfully accessed !
kubectl apply -f nginx.yaml
# pod/nginx-pod created

kubectl get pods
# nginx-pod         1/1     Running   0           6s

kubectl port-forward nginx-pod 4000:80
# Forwarding from 127.0.0.1:4000 -> 80
# Forwarding from [::1]:4000 -> 80
The kubectl exec -it can be used to enter the Pod container's shell and configure the contents of the nginx home page with the following command.
kubectl exec -it nginx-pod /bin/bash

echo "hello kubernetes by nginx!" > /usr/share/nginx/html/index.html

kubectl port-forward nginx-pod 4000:80
Finally, you can access http://127.0.0.1:4000 through your browser or curl to see if nginx was started successfully and return the string hello kubernetes by nginx!.
Going back to the difference between pod and container, we see that the resources we just created are shown in the figure below.
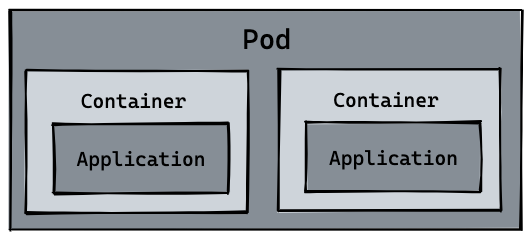
So naturally pod can manage multiple containers, and in some scenarios such as file exchange between services (log collection), local network communication needs (local communication using localhost or socket files), using pod to manage multiple containers in these scenarios is highly recommended. This is also the first example of how k8s handles the complex relationships between services, as shown in the following diagram.
We can view pod logs with the logs or logs -f command, enter the pod with exec -it or invoke the container command, and delete pod resources with delete pod or delete -f nginx.yaml. Here you can see kubectl all commands.
kubectl logs --follow nginx-pod

kubectl exec nginx-pod -- ls

kubectl delete pod nginx-pod
# pod "nginx-pod" deleted

kubectl delete -f nginx.yaml
# pod "nginx-pod" deleted
Finally, based on the image of hellok8s:v1 that we built in that section of container and referring to the resource definition of the nginx pod, can you write the resource file of the hellok8s:v1 Pod alone. and access it via port-forward to the local port 3000 to get the final string [v1] Hello, Kubernetes!.
hellok8s:v1 The Pod resource definition and corresponding commands are shown below.
# hellok8s.yaml
apiVersion: v1
kind: Pod
metadata:
  name: hellok8s
spec:
  containers:
    - name: hellok8s-container
      image: guangzhengli/hellok8s:v1
kubectl apply -f hellok8s.yaml
kubectl get pods
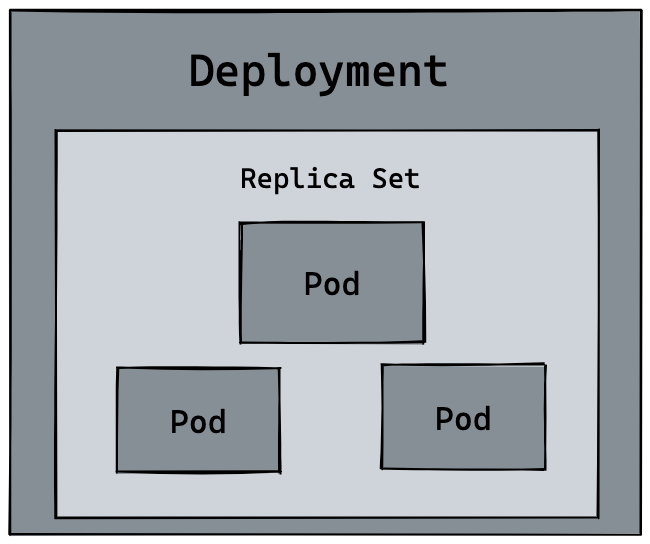
kubectl port-forward hellok8s 3000:3000In a production environment, we basically don't manage pods directly, we need kubernetes to help us automate some operations, such as auto-scaling or auto-upgrading versions. Imagine in a production environment, we have 10 hellok8s:v1 pods deployed manually, and we need to upgrade to hellok8s:v2, do we need to upgrade the hellok8s:v1 pods one by one manually?
This is when we need to look at deployment, another resource of kubernetes, to help us manage pods.
First you can create a deployment.yaml file to manage the hellok8s pod.
apiVersion: apps/v1
kind: Deployment
metadata:
  name: hellok8s-deployment
spec:
  replicas: 1
  selector:
    matchLabels:
      app: hellok8s
  template:
    metadata:
      labels:
        app: hellok8s
    spec:
      containers:
        - image: guangzhengli/hellok8s:v1
          name: hellok8s-container
kind indicates that the resource we want to create is of type deployment and metadata.name indicates the name of the deployment to be created, which needs to be unique.
In spec, first replicas indicates the number of deployed pod copies, and selector indicates the way deployment resources are associated with pod resources, where deployment manages (selector) all labels=hellok8s of pods.
The content of template is used to define pod resources, you will find that the definition of Hellok8s Pod resources is similar, the only difference is that we need to add metadata.labels to match the above selector.matchLabels correspond. To indicate that the pod is managed by a deployment, there is no need to add a metadata.name to the template because the deployment will automatically create a unique name for the pod for us.
Next, enter the following command to create a deployment resource. With the get and delete pod commands, we'll get a first taste of deployment. The pod name will change each time it is created, so remember to replace some commands with the name of your pod
kubectl apply -f deployment.yaml

kubectl get deployments
#NAME                  READY   UP-TO-DATE   AVAILABLE   AGE
#hellok8s-deployment   1/1     1            1           39s

kubectl get pods
#NAME                                   READY   STATUS    RESTARTS   AGE
#hellok8s-deployment-77bffb88c5-qlxss   1/1     Running   0          119s

kubectl delete pod hellok8s-deployment-77bffb88c5-qlxss
#pod "hellok8s-deployment-77bffb88c5-qlxss" deleted

kubectl get pods
#NAME                                   READY   STATUS    RESTARTS   AGE
#hellok8s-deployment-77bffb88c5-xp8f7   1/1     Running   0          18s
It is interesting to note that when manually deleting a pod resource, deployment will automatically create a new pod, which is fundamentally different from creating pod resources manually! This means that when the production environment is managing thousands of pods, we don't need to care about the specifics, we just need to maintain the resource definitions in this deployment.yaml file.
Next, let's deepen this knowledge by auto-expansion. When we want to expand the resources of hellok8s:v1 to 3 copies, we just need to set the value of replicas to 3, and then retype kubectl apply -f deployment.yaml. This looks like the following.
apiVersion: apps/v1
kind: Deployment
metadata:
  name: hellok8s-deployment
spec:
  replicas: 3
  selector:
    matchLabels:
      app: hellok8s
  template:
    metadata:
      labels:
        app: hellok8s
    spec:
      containers:
        - image: guangzhengli/hellok8s:v1
          name: hellok8s-container
You can execute the kubectl get pods --watch command in the new window before kubectl apply to observe the records of pod startup and deletion. It is also very simple to reduce the number of replicas. You can try to increase or decrease the number of replicas at will , and then use watch to observe its status.
We next try to upgrade all v1 pods to v2. First we need to build a version image of hellok8s:v2. The only difference is that the string is replaced with [v2] Hello, Kubernetes!.
package main

import (
	"io"
	"net/http"
)

func hello(w http.ResponseWriter, r *http.Request) {
	io.WriteString(w, "[v2] Hello, Kubernetes!")
}

func main() {
	http.HandleFunc("/", hello)
	http.ListenAndServe(":3000", nil)
}
Push hellok8s:v2 to the DockerHub repository.
docker build . -t guangzhengli/hellok8s:v2
docker push guangzhengli/hellok8s:v2
Then write the v2 version of the deployment resource file.
apiVersion: apps/v1
kind: Deployment
metadata:
  name: hellok8s-deployment
spec:
  replicas: 3
  selector:
    matchLabels:
      app: hellok8s
  template:
    metadata:
      labels:
        app: hellok8s
    spec:
      containers:
        - image: guangzhengli/hellok8s:v2
          name: hellok8s-container
kubectl apply -f deployment.yaml
# deployment.apps/hellok8s-deployment configured
kubectl get pods
# NAME READY STATUS RESTARTS AGE
# hellok8s-deployment-66799848c4-kpc6q 1/1 Running 0 3s
# hellok8s-deployment-66799848c4-pllj6 1/1 Running 0 3s
# hellok8s-deployment-66799848c4-r7qtg 1/1 Running 0 3s
kubectl port-forward hellok8s-deployment-66799848c4-kpc6q 3000:3000
# Forwarding from 127.0.0.1:3000 -> 3000
# Forwarding from [::1]:3000 -> 3000
# open another terminal
curl http://localhost:3000
# [v2] Hello, Kubernetes!You can also type kubectl describe pod hellok8s-deployment-66799848c4-kpc6q to see if it is a v2 version of the image.
If we are managing multiple copies of the hellok8s:v1 pod on our production environment and we need to update to v2, a deployment like the one above is possible, but it also poses the problem that all the copies are updated at the same time, which will cause our hellok8s service to be unavailable for a short period of time because all pods are in the process of being upgraded to v2 and need to wait for a pod to finish before they can provide the service.
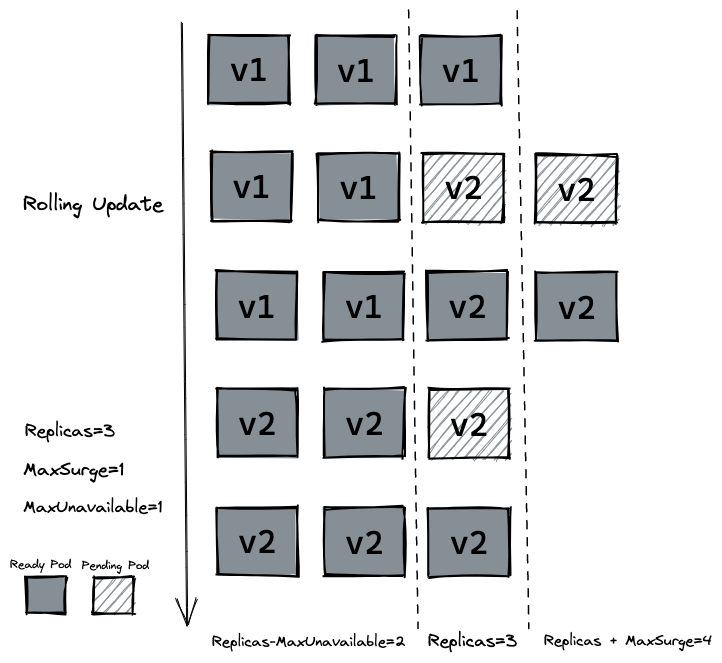
At this point we need a rolling update that does not delete the v1 version of the pod until the new v2 version of the pod is ready.
In the deployment resource definition, there are two options for spec.strategy.type:
- RollingUpdate: Gradually add new versions of pods and gradually reduce old versions of pods.
- Recreate: Remove all old versions of pods before adding new ones.
In most cases, we will use the method of RollingUpdate. The rolling update can control the rate of upgrading pods through the maxSurge and maxUnavailable fields. For details, see [Official Website Definition](https://kubernetes. io/en-us/docs/concepts/workloads/controllers/deployment/). :
- maxSurge: Maximum peak, which specifies the number of Pods that can be created beyond the desired number of Pods.
- maxUnavailable: Maximum unavailable, used to specify the upper limit of the number of Pods that are unavailable during the update process.
We first enter the command to roll back our deployment, enter kubectl describe pod and you will find that the deployment has rolled back the v2 version of the pod to the v1 version.
kubectl rollout undo deployment hellok8s-deployment

kubectl get pods
# NAME                                   READY   STATUS    RESTARTS   AGE
# hellok8s-deployment-77bffb88c5-cvm5c   1/1     Running   0          39s
# hellok8s-deployment-77bffb88c5-lktbl   1/1     Running   0          41s
# hellok8s-deployment-77bffb88c5-nh82z   1/1     Running   0          37s

kubectl describe pod hellok8s-deployment-77bffb88c5-cvm5c
# Image: guangzhengli/hellok8s:v1
In addition to the above commands, you can also use history to view the historical version, --to-revision=2 to roll back to the specified version.
kubectl rollout history deployment hellok8s-deployment
kubectl rollout undo deployment/hellok8s-deployment --to-revision=2
接着设置 strategy=rollingUpdate , maxSurge=1 , maxUnavailable=1 和 replicas=3 到 deployment.yaml 文件中。这个参数配置意味着最大可能会创建 4 个 hellok8s pod (replicas + maxSurge),最小会有 2 个 hellok8s pod 存活 (replicas - maxUnavailable)。
Then set strategy=rollingUpdate , maxSurge=1 , maxUnavailable=1 and replicas=3 to deployment.yaml file. This parameter configuration means that a maximum of 4 hellok8s pods may be created (replicas + maxSurge), and a minimum of 2 hellok8s pods will survive (replicas - maxUnavailable).
apiVersion: apps/v1
kind: Deployment
metadata:
  name: hellok8s-deployment
spec:
  strategy:
     rollingUpdate:
      maxSurge: 1
      maxUnavailable: 1
  replicas: 3
  selector:
    matchLabels:
      app: hellok8s
  template:
    metadata:
      labels:
        app: hellok8s
    spec:
      containers:
      - image: guangzhengli/hellok8s:v2
        name: hellok8s-container
Use kubectl apply -f deployment.yaml to recreate v2 resources, and use kubectl get pods --watch to observe the creation and destruction of pods, whether as shown in the following figure.
Liveness probes to determine when to restart containers. For example, a liveness probe can detect an application deadlock (the application is running, but cannot continue with subsequent steps). Restarting a container in this state can help improve the availability of the application, even if it has bugs. -- LivenessProb
In production, sometimes the application deadlocks or the threads are exhausted due to some bugs, and eventually the application cannot continue to provide services. At this time, if there is no means to automatically monitor and deal with this problem, it may lead to a long period of time. No time has been found. kubelet uses a liveness probe (livenessProb) to determine when to restart a container.
Next we write a /healthz interface to illustrate how livenessProb is used. The /healthz interface will normally return a status code of 200 within 15s of successful startup, and will always return a status code of 500 after 15s.
package main

import (
	"fmt"
	"io"
	"net/http"
	"time"
)

func hello(w http.ResponseWriter, r *http.Request) {
	io.WriteString(w, "[v2] Hello, Kubernetes!")
}

func main() {
	started := time.Now()
	http.HandleFunc("/healthz", func(w http.ResponseWriter, r *http.Request) {
		duration := time.Since(started)
		if duration.Seconds() > 15 {
			w.WriteHeader(500)
			w.Write([]byte(fmt.Sprintf("error: %v", duration.Seconds())))
		} else {
			w.WriteHeader(200)
			w.Write([]byte("ok"))
		}
	})

	http.HandleFunc("/", hello)
	http.ListenAndServe(":3000", nil)
}
# Dockerfile
FROM golang:1.16-buster AS builder
RUN mkdir /src
ADD . /src
WORKDIR /src
RUN go env -w GO111MODULE=auto
RUN go build -o main .
FROM gcr.io/distroless/base-debian10
WORKDIR /
COPY --from=builder /src/main /main
EXPOSE 3000
ENTRYPOINT ["/main"]The writing of Dockerfile is the same as the original, we changed tag to liveness and pushed it to the remote repository.
docker build . -t guangzhengli/hellok8s:liveness
docker push guangzhengli/hellok8s:liveness
Finally, write the definition of deployment. The liveness detection method here is to use HTTP GET request. The request is the /healthz interface just defined. The periodSeconds field specifies that the kubelet performs a liveness detection every 3 seconds. The initialDelaySeconds field tells the kubelet that it should wait 3 seconds before performing the first probe. If the handler in the /healthz path on the server returns a success code, the kubelet considers the container to be healthy and alive. If the handler returns a failure code, the kubelet will kill the container and restart it.
apiVersion: apps/v1
kind: Deployment
metadata:
  name: hellok8s-deployment
spec:
  strategy:
     rollingUpdate:
      maxSurge: 1
      maxUnavailable: 1
  replicas: 3
  selector:
    matchLabels:
      app: hellok8s
  template:
    metadata:
      labels:
        app: hellok8s
    spec:
      containers:
        - image: guangzhengli/hellok8s:liveness
          name: hellok8s-container
          livenessProbe:
            httpGet:
              path: /healthz
              port: 3000
            initialDelaySeconds: 3
            periodSeconds: 3
The pods are always restarting through the get or describe commands.
kubectl apply -f deployment.yaml

kubectl get pods
# NAME                                   READY   STATUS    RESTARTS     AGE
# hellok8s-deployment-5995ff9447-d5fbz   1/1     Running   4 (6s ago)   102s
# hellok8s-deployment-5995ff9447-gz2cx   1/1     Running   4 (5s ago)   101s
# hellok8s-deployment-5995ff9447-rh29x   1/1     Running   4 (6s ago)   102s

kubectl describe pod hellok8s-68f47f657c-zwn6g

# ...
# ...
# ...
# Events:
#  Type     Reason     Age                   From               Message
#  ----     ------     ----                  ----               -------
#  Normal   Scheduled  12m                   default-scheduler  Successfully assigned default/hellok8s-deployment-5995ff9447-rh29x to minikube
#  Normal   Pulled     11m (x4 over 12m)     kubelet            Container image "guangzhengli/hellok8s:liveness" already present on machine
#  Normal   Created    11m (x4 over 12m)     kubelet            Created container hellok8s-container
#  Normal   Started    11m (x4 over 12m)     kubelet            Started container hellok8s-container
#  Normal   Killing    11m (x3 over 12m)     kubelet            Container hellok8s-container failed liveness probe, will be restarted
#  Warning  Unhealthy  11m (x10 over 12m)    kubelet            Liveness probe failed: HTTP probe failed with statuscode: 500
# Warning BackOff 2m41s (x36 over 10m) kubelet Back-off restarting failed containerReadiness detectors can know when containers are ready to accept request traffic, and a Pod can only be considered ready when all containers within it are ready. One use for such a signal is to control which Pod is the backend for a Service. If the Pod is not ready, it will be removed from the Service Load Balancer. -- ReadinessProb
In the production environment, upgrading the version of the service is a daily requirement. At this time, we need to consider a scenario, that is, when there is a problem with the released version, it should not be upgraded successfully. The kubelet uses the readiness detector to know when the container is ready to accept request traffic. When a pod is not ready after an upgrade, it should not allow traffic to enter the pod. With the function of rollingUpate, the upgraded version cannot be allowed to continue. Otherwise, all services will be upgraded and all services will be unavailable.
Here we roll back the service to the hellok8s:v2 version, which can be rolled back through the method learned above.
kubectl rollout undo deployment hellok8s-deployment --to-revision=2Here we set the application's /healthz interface directly to return a status code of 500, which means that the version is a problematic version.
package main

import (
	"io"
	"net/http"
)

func hello(w http.ResponseWriter, r *http.Request) {
	io.WriteString(w, "[v2] Hello, Kubernetes!")
}

func main() {
	http.HandleFunc("/healthz", func(w http.ResponseWriter, r *http.Request) {
			w.WriteHeader(500)
	})

	http.HandleFunc("/", hello)
	http.ListenAndServe(":3000", nil)
}
In the build phase we set the tag to bad, package it and push it to the remote repository.
docker build . -t guangzhengli/hellok8s:bad

docker push guangzhengli/hellok8s:bad
Then write the deployment resource file, Probe There are many configuration fields, you can use these fields to accurately Controls the behavior of readiness detection:
initialDelaySeconds:The number of seconds to wait after the container is started before starting the liveness and ready probes. The default is 0 seconds, and the minimum value is 0.periodSeconds:The time interval (in seconds) to perform probes. The default is 10 seconds. The minimum value is 1.timeoutSeconds:How many seconds to wait after the probe's timeout. The default value is 1 second. The minimum value is 1.successThreshold:The minimum number of consecutive successes at which a probe is considered successful after a failure. The default value is 1. This value must be 1 for liveness and startup probes. The minimum value is 1.failureThreshold:The number of retries for Kubernetes when the probe fails. For liveness detection, giving up means restarting the container. For readiness detection, abandonment means that the Pod will be marked as not ready. The default value is 3. The minimum value is 1.
apiVersion: apps/v1
kind: Deployment
metadata:
  name: hellok8s-deployment
spec:
  strategy:
     rollingUpdate:
      maxSurge: 1
      maxUnavailable: 1
  replicas: 3
  selector:
    matchLabels:
      app: hellok8s
  template:
    metadata:
      labels:
        app: hellok8s
    spec:
      containers:
        - image: guangzhengli/hellok8s:bad
          name: hellok8s-container
          readinessProbe:
            httpGet:
              path: /healthz
              port: 3000
            initialDelaySeconds: 1
            successThreshold: 5
Through the get command, you can find that the two pods have been in a state of not yet Ready. Through the describe command, you can see that it is because of Readiness probe failed: HTTP probe failed with statuscode: 500 The reason. And because the minimum number of unavailable services is set to maxUnavailable=1, this ensures that the remaining two v2 versions of hellok8s can continue to provide services!
kubectl apply -f deployment.yaml

kubectl get pods
# NAME                                   READY   STATUS    RESTARTS   AGE
# hellok8s-deployment-66799848c4-8xzsz   1/1     Running   0          102s
# hellok8s-deployment-66799848c4-m9dl5   1/1     Running   0          102s
# hellok8s-deployment-9c57c7f56-rww7k    0/1     Running   0          26s
# hellok8s-deployment-9c57c7f56-xt9tw    0/1     Running   0          26s


kubectl describe pod hellok8s-deployment-9c57c7f56-rww7k
# Events:
#   Type     Reason     Age                From               Message
#   ----     ------     ----               ----               -------
#   Normal   Scheduled  74s                default-scheduler  Successfully assigned default/hellok8s-deployment-9c57c7f56-rww7k to minikube
#   Normal   Pulled     73s                kubelet            Container image "guangzhengli/hellok8s:bad" already present on machine
#   Normal   Created    73s                kubelet            Created container hellok8s-container
#   Normal   Started    73s                kubelet            Started container hellok8s-container
#   Warning  Unhealthy  0s (x10 over 72s)  kubelet            Readiness probe failed: HTTP probe failed with statuscode: 500