Skip to content
New issue

Have a question about this project? Sign up for a free GitHub account to open an issue and contact its maintainers and the community.

By clicking “Sign up for GitHub”, you agree to our terms of service and privacy statement. We’ll occasionally send you account related emails.

Already on GitHub? Sign in to your account

追女神必备使用 Python 构建小红书用户动态监控系统 #11949

Open
guevara opened this issue Jan 16, 2025 · 0 comments
Open

追女神必备使用 Python 构建小红书用户动态监控系统 #11949

guevara opened this issue Jan 16, 2025 · 0 comments

Comments

@guevara
Copy link
Owner

guevara commented Jan 16, 2025

追女神必备!使用 Python 构建小红书用户动态监控系统


https://ift.tt/2GYRUqu


前言

“今天她又发新笔记了吗?”

“糟了,她更新了我却没能第一时间看到…”

“为什么别人都能秒回评论,我却总是来晚一步…”

“为什么我总是错过她的新动态…”

相信很多同学都有过这样的经历。作为一名资深舔狗,一直秉承着 “舔得狗中狗,方为人上人” 的原则,必须 24 小时待命,不能错过女神的任何动态,但同时作为一名资深软件工程师,与其整天盯着手机刷新,不如用技术来解决这个问题!
今天,我们就来构建一个专属得“女神小红书动态监控系统”,让你永远不错过她的每一条动态,永远第一时间向她嘘寒问暖,做她最忠实的粉丝(舔狗)!

需求分析

作为一名合格的舔狗,我们需要:

  • 实时监控女神的小红书最新笔记
  • 第一时间获得更新提醒
  • 快人一步送上点赞或者评论

通过这个项目,你将获得:

  • 女神更新笔记时,第一时间收到通知
  • 展现你的技术实力
  • 提升你的 Python 编程能力
  • 成为女神最忠实的粉丝(舔狗)

技术方案

为了实现这个浪漫的需求,我们需要:

  • 使用 Python + xhs 库获取女神的最新笔记
  • 通过企业微信接收消息通知
  • 使用 SQLite 存储笔记历史数据

确定好大致技术方案后,就让我们开始这段浪漫的编程之旅吧!

创建项目

首先让我们创建一个新的项目目录并进入该目录,然后创建一个虚拟环境,并安装所需的依赖库。

1
2
3
4
5
6
7
8
9
10
11
12
13
14
15

mkdir xhs-monitor
cd xhs-monitor


python -m venv venv


source venv/bin/activate


venv\Scripts\activate


pip install requests xhs playwright sqlite3

核心代码实现

实现配置模块

创建 config.py 文件, 用来配置小红书,企业微信通知以及监控相关的可配置信息。

1
2
3
4
5
6
7
8
9
10
11
12
13
14
15
16

XHS_CONFIG = {
"COOKIE": "你的小红书Cookie",
}

WECOM_CONFIG = {
"CORPID": "你的企业ID",
"AGENTID": 你的应用ID,
"SECRET": "你的应用Secret",
}

MONITOR_CONFIG = {
"USER_ID": "女神的用户ID",
"CHECK_INTERVAL": 5,
"ERROR_COUNT": 10,
}

实现企业微信通知模块

创建 wecom.py 文件, 用来实现企业微信通知功能。

1
2
3
4
5
6
7
8
9
10
11
12
13
14
15
16
17
18
19
20
21
22
23
24
25
26
27
28
29
30
31
32
33
34
35
36
37
38
39
40
41
42
43
44
45
46
47
48
49
50
51
52
53
54
55
56
57
58
59
60
61
62
63
64
65
66
67
68
69
70
71
72
73
74
75
76
77
78
79
80
81
82

import time
import requests

class WecomMessage:
def __init__(self, corpid: str, agentid: int, secret: str):
"""
初始化企业微信消息发送类
:param corpid: 企业ID
:param agentid: 应用ID
:param secret: 应用的Secret
"""
self.corpid = corpid
self.agentid = agentid
self.secret = secret
self.access_token = None
self.token_expires_time = 0

def get_access_token(self) -> str:
"""
获取访问令牌
:return: access_token
"""
now = time.time()
if self.access_token and now < self.token_expires_time:
return self.access_token

url = "https://qyapi.weixin.qq.com/cgi-bin/gettoken"
params = {
"corpid": self.corpid,
"corpsecret": self.secret
}

try:
response = requests.get(url, params=params)
data = response.json()

if data.get("errcode") == 0:
self.access_token = data.get("access_token")
self.token_expires_time = now + data.get("expires_in") - 200
return self.access_token
else:
raise Exception(f"获取access_token失败: {data}")
except Exception as e:
print(f"获取access_token异常: {e}")
raise

def send_text(self, content: str, touser: str = "@all") -> bool:
"""
发送文本消息
:param content: 消息内容
:param touser: 接收人,默认为所有人
:return: 是否发送成功
"""
try:
message = {
"touser": touser,
"msgtype": "text",
"agentid": self.agentid,
"text": {
"content": content
},
"enable_duplicate_check": 1,
"duplicate_check_interval": 1800
}

access_token = self.get_access_token()
url = f"https://qyapi.weixin.qq.com/cgi-bin/message/send?access_token={access_token}"

response = requests.post(url, json=message)
result = response.json()

if result.get("errcode") == 0:
print(f"企业微信消息发送成功")
return True
else:
print(f"企业微信消息发送失败: {result}")
return False

except Exception as e:
print(f"企业微信消息发送异常: {e}")
return False
  • 我们创建一个 WecomMessage 类, 用来实现企业微信通知功能。
  • 根据企业微信相关文档(https://developer.work.weixin.qq.com/document/path/90236), 我们使用企业微信的 message API 来发送应用消息实现通知。这需要一些企业微信的配置信息, 包括企业ID, 应用ID, 应用Secret。我们通过配置模块存放这些信息,并将这些信息作为 WecomMessage 类的 __init__ 方法的参数。
  • 发送应用消息需要获取访问令牌(access_token), 我们通过 get_access_token 方法来获取。
  • 最后,我们通过 send_text 方法来发送文本消息。

实现数据库模块

创建 db.py 文件, 用来实现数据库相关功能。

1
2
3
4
5
6
7
8
9
10
11
12
13
14
15
16
17
18
19
20
21
22
23
24
25
26
27
28
29
30
31
32
33
34
35
36
37
38
39
40
41
42
43
44
45
46
47
48
49
50
51
52
53
54
55
56
57
58
import sqlite3
from datetime import datetime
from typing import List

class Database:
def __init__(self, db_path: str = "notes.db"):
"""
初始化数据库连接
:param db_path: 数据库文件路径
"""
self.db_path = db_path
self.init_db()

def init_db(self):
"""
初始化数据库表
"""
with sqlite3.connect(self.db_path) as conn:
cursor = conn.cursor()
cursor.execute('''
CREATE TABLE IF NOT EXISTS notes (
note_id TEXT PRIMARY KEY,
user_id TEXT NOT NULL,
title TEXT,
discovered_time TEXT NOT NULL,
type TEXT
)
''')
conn.commit()

def add_note_if_not_exists(self, note_data: dict) -> bool:
"""
添加笔记记录
:param note_data: 笔记数据
:return: 是否为新笔记
"""

with sqlite3.connect(self.db_path) as conn:
cursor = conn.cursor()

cursor.execute('SELECT note_id FROM notes WHERE note_id = ?',
(note_data.get('note_id'),))
if cursor.fetchone():
return False

cursor.execute('''
INSERT INTO notes (
note_id, user_id, title, discovered_time, type
) VALUES (?, ?, ?, ?, ?)
''', (
note_data.get('note_id'),
note_data.get('user').get('user_id'),
note_data.get('display_title', '无标题'),
datetime.now().strftime('%Y-%m-%d %H:%M:%S'),
note_data.get('type', 'normal')
))
conn.commit()
return True
  • 我们创建一个 Database 类, 用来实现数据库相关功能。
  • 通过 init_db 方法来初始化数据库表, 如果 notes 数据库表不存在, 则创建它。
  • 通过 add_note_if_not_exists 方法来添加笔记记录。如果笔记已存在, 则返回 False, 否则将笔记插入到数据库表并返回 True
    • 由于该监控系统主要是监控用户是否有新笔记,对笔记的具体内容并不是很关心, 所以这里我们只保存笔记的 id, 用户 id, 标题, 发现时间以及笔记类型。
    • 之所以将笔记持久化到数据库,也只是为了去重,防止重复发送通知。

实现工具模块

创建 utils.py 文件, 用来实现程序所需的工具函数。

1
2
3
4
5
6
7
8
9
10
11
12
13
14
15
16
17
18
19
20
21
22
23
24
25
26
27
28
29
30
31
32
from playwright.sync_api import sync_playwright
from time import sleep

def xhs_sign(uri, data=None, a1="", web_session=""):
for _ in range(10):
try:
with sync_playwright() as playwright:
stealth_js_path = "public/stealth.min.js"
chromium = playwright.chromium


browser = chromium.launch(headless=True)

browser_context = browser.new_context()
browser_context.add_init_script(path=stealth_js_path)
context_page = browser_context.new_page()
context_page.goto("https://www.xiaohongshu.com")
browser_context.add_cookies([
{'name': 'a1', 'value': a1, 'domain': ".xiaohongshu.com", 'path': "/"}]
)
context_page.reload()

sleep(1)
encrypt_params = context_page.evaluate("([url, data]) => window._webmsxyw(url, data)", [uri, data])
return {
"x-s": encrypt_params["X-s"],
"x-t": str(encrypt_params["X-t"])
}
except Exception:

pass
raise Exception("重试了这么多次还是无法签名成功,寄寄寄")
  • 这里我们实现了一个 xhs_sign 方法,用来生成小红书请求的签名。
  • 该方法通过 playwright 库来模拟浏览器行为,获取小红书请求的签名,并返回签名信息。而不是直接逆向小红书请求的签名算法,因为小红书请求的签名算法可能会随时更新,导致我们之前逆向的代码失效。
  • 如果签名获取失败,则抛出异常,并重试 10 次。

实现监控主程序

创建 monitor.py 文件, 用来实现监控主程序。

1
2
3
4
5
6
7
8
9
10
11
12
13
14
15
16
17
18
19
20
21
22
23
24
25
26
27
28
29
30
31
32
33
34
35
36
37
38
39
40
41
42
43
44
45
46
47
48
49
50
51
52
53
54
55
56
57
58
59
60
61
62
63
64
65
66
67
68
69
70
71
72
73
74
75
76
77
78
79
80
81
82
83
84
85
86
87
88
89
90
91
92
93
94
95
96
97
98
99
100
101
102
103
104
105
106
107
108
109
110
111
112
113
114
115
116
117
118
119
120
121
from xhs import XhsClient
import time
from typing import List
from config import XHS_CONFIG, WECOM_CONFIG, MONITOR_CONFIG
from utils import xhs_sign
from db import Database
from wecom import WecomMessage

class XHSMonitor:
def __init__(self, cookie: str, corpid: str, agentid: int, secret: str):
"""
初始化监控类
:param cookie: 小红书cookie
:param corpid: 企业ID
:param agentid: 应用ID
:param secret: 应用的Secret
"""
self.client = XhsClient(cookie=cookie, sign=xhs_sign)
self.wecom = WecomMessage(corpid, agentid, secret)
self.db = Database()
self.error_count = 0

def send_error_notification(self, error_msg: str):
"""
发送错误通知
:param error_msg: 错误信息
"""
time_str = time.strftime('%Y-%m-%d %H:%M:%S')
content = (
"小红书监控异常告警\n"
f"错误信息:{error_msg}\n"
f"告警时间:{time_str}"
)
self.wecom.send_text(content)

def get_latest_notes(self, user_id: str) -> List[dict]:
"""
获取用户最新笔记
:param user_id: 用户ID
:return: 笔记列表
"""
try:
res_data = self.client.get_user_notes(user_id)
self.error_count = 0
return res_data.get('notes', [])

except Exception as e:
error_msg = str(e)

print(f"获取用户笔记失败: {error_msg}")

time.sleep(60)

self.error_count += 1

if self.error_count >= MONITOR_CONFIG["ERROR_COUNT"]:
self.send_error_notification(f"API 请求失败\n详细信息:{error_msg}")
exit(-1)

return []

def send_note_notification(self, note_data: dict):
"""
发送笔记通知
:param note_data: 笔记数据
"""
note_url = f"https://www.xiaohongshu.com/explore/{note_data.get('note_id')}"
user_name = note_data.get('user', {}).get('nickname', '未知用户')
title = note_data.get('display_title', '无标题')
type = note_data.get('type', '未知类型')
time_str = time.strftime('%Y-%m-%d %H:%M:%S')

content = (
"小红书用户发布新笔记\n"
f"用户:{user_name}\n"
f"标题:{title}\n"
f"链接:{note_url}\n"
f"类型:{type}\n"
f"监控时间:{time_str}"
)

self.wecom.send_text(content)

def monitor_user(self, user_id: str, interval: int):
"""
监控用户动态
:param user_id: 用户ID
:param interval: 检查间隔(秒)
"""
print(f"开始监控用户: {user_id}")

while True:
try:
latest_notes = self.get_latest_notes(user_id)

for note in latest_notes:
if self.db.add_note_if_not_exists(note):
print(f"发现新笔记: {note.get('display_title')}")
self.send_note_notification(note)

except Exception as e:
error_msg = str(e)
print(f"监控过程发生错误: {error_msg}")
time.sleep(interval)

def main():
monitor = XHSMonitor(
cookie=XHS_CONFIG["COOKIE"],
corpid=WECOM_CONFIG["CORPID"],
agentid=WECOM_CONFIG["AGENTID"],
secret=WECOM_CONFIG["SECRET"]
)

monitor.monitor_user(
user_id=MONITOR_CONFIG["USER_ID"],
interval=MONITOR_CONFIG["CHECK_INTERVAL"]
)

if __name__ == "__main__":
main()

  • 首先我们定义一个 main 函数,用来启动监控。main 函数中我们通过 XHSMonitor 类来初始化监控对象,并传入配置模块中的小红书 cookie, 企业微信配置信息以及监控配置信息。
  • 然后我们通过 monitor_user 方法来监控女神的最新笔记。
  • XHSMonitor 类中我们一共需要实现 5 个方法, 分别是:
    • __init__ 方法
    • send_error_notification 方法
    • send_note_notification 方法
    • get_latest_notes 方法
    • monitor_user 方法

XHSMonitor 类详解

__init__ 方法

__init__ 方法用来初始化监控对象的属性, 我们需要在这个方法中初始化 xhsClient 对象, wecomMessage 对象以及 database 对象,并赋值给监控对象对应的属性。同时,我们还需要初始化一个错误计数器,用来记录 API 请求失败的次数。
其中在初始化 xhsClient 对象时,我们传入了 cookie 和 sign 参数。cookie 是我们在配置模块中配置的小红书 cookie,sign 则是我们在 utils 模块中实现的 xhs_sign 方法, 用来生成小红书请求的签名。

get_latest_notes 方法

get_latest_notes 方法的主要功能是获取女神的最新笔记。内部通过 XhsClientget_user_notes 方法来获取小红书用户笔记。如果获取失败,则将错误信息记录到错误计数器中,如果错误计数器达到最大重试次数,则调用 send_error_notification 方法发送错误通知并退出程序。当然,如果获取成功,则将错误计数器清零。由于大多数错误是触发了小红书的反爬虫机制,所以这里我们也会通过 sleep 方法来等待一段时间,然后再重试。

send_error_notification 方法

send_error_notification 方法的主要功能是发送错误通知到企业微信。核心逻辑也很简单,就是将错误信息和当前时间拼接成一条文本消息,然后调用 WecomMessagesend_text 方法发送。

monitor_user 方法

monitor_user 方法用来监控女神的最新笔记。通过 while 循环不断调用 get_latest_notes 方法获取女神的最新笔记,然后通过 add_note_if_not_exists 方法判断笔记是否已存在,如果笔记不存在,则说明是新笔记,则调用 send_note_notification 方法发送笔记通知到企业微信,告知我们女神发布了新笔记,我们就可以第一时间去点赞或者评论了。

send_note_notification 方法

send_note_notification 方法和 send_error_notification 类似。将笔记的标题, 链接, 类型, 监控时间以及用户名拼接成一条文本消息,然后调用 WecomMessagesend_text 方法发送。

运行监控程序

以上,我们的核心代码已经实现完毕,接下来我们就可以运行我们的监控程序,测试程序是否正常,行为是否符合预期。

在正式运行之前,我们需要先配置好小红书 cookie, 企业微信配置信息以及监控配置信息。

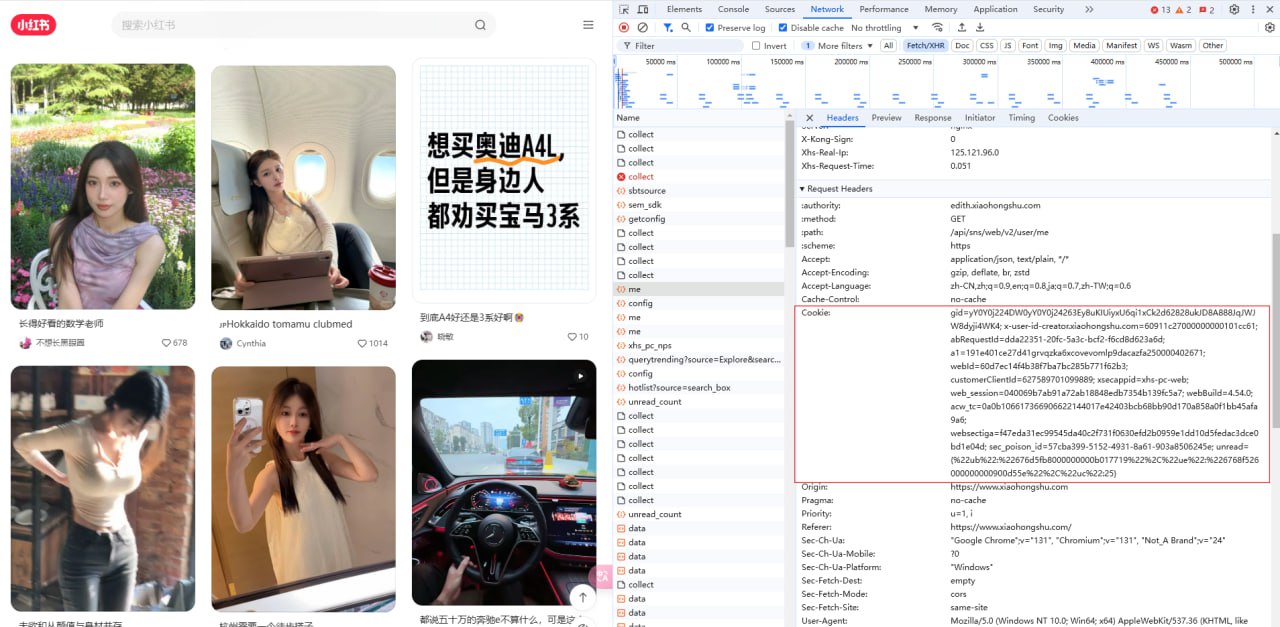
我们登录小红书 Web 端,打开开发者工具,在 Network 标签下找到请求头中包含 Cookie(a1, web_session 和 webId)的请求,复制请求头中的 Cookie 信息,然后粘贴到配置模块中的 XHS_CONFIG 中。
xhs_cookie

获取企业微信配置信息

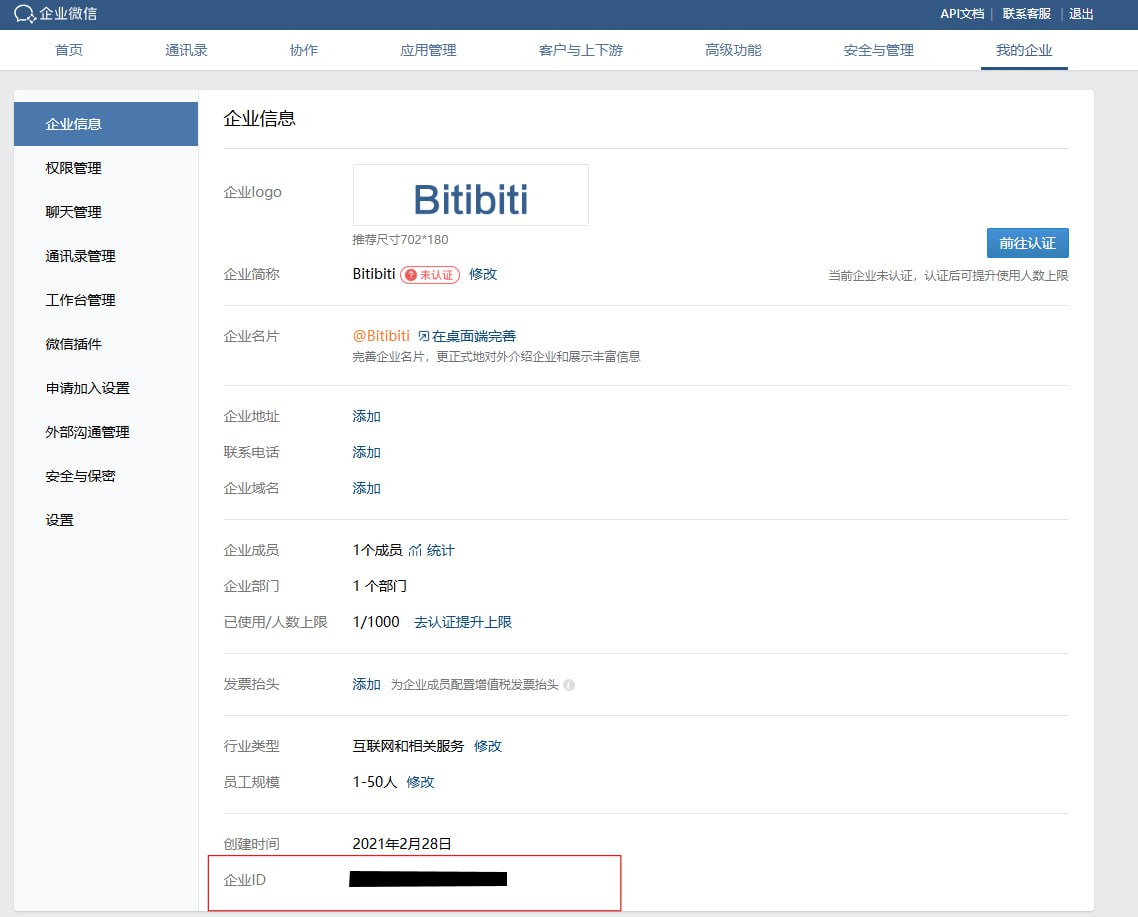
登录企业微信后台,创建一个企业或者加入一个企业,获取企业的 CORPID,然后在应用管理中创建一个应用,获取应用的 AGENTID 和 SECRET,然后粘贴到配置模块中的 WECOM_CONFIG 中。
wecom_config
wecom_agentid

获取女神小红书用户 ID

通过小红书 Web 端,访问女神的笔记主页,浏览器地址栏 /user/profile/xxx 中的 xxx 就是小红书用户 ID。
xhs_user_id

本地运行

当完成以上配置后,本地运行很简单,只需要在终端中执行以下命令即可:

xhs_monitor
当终端输出 “开始监控用户: xxxxxxx” 时,说明监控程序已经启动成功,女神发布新笔记时,我们就会收到通知了。(注意:第一次启动时,由于数据库中没有数据,所以会发送很多通知,不用担心,这些通知都是女神之前的笔记,我们只需要持续运行监控,关注新笔记即可)
xhs_monitor_success

部署到云服务器

部署到云服务器,可以保证监控程序的持久运行。我们使用 screen 保持程序在后台持续运行。

1
2
3
4
screen -S xhs_monitor
python monitor.py


结语

通过这篇教程,我们实现了一个女神小红书动态监控系统,让我们永远不错过她的每一条动态,永远第一时间向她嘘寒问暖,做她最忠实的粉丝(舔狗)! 但是,技术只是手段,真正的爱情需要我们用心去经营,希望各位同学都能追到自己的女神,并和她一起走向幸福的未来!

项目地址

https://github.com/beilunyang/xhs-monitor


via 悖论の小黑屋

January 16, 2025 at 10:04AM
Sign up for free to join this conversation on GitHub. Already have an account? Sign in to comment
Labels
None yet
Projects
None yet
Development

No branches or pull requests

1 participant